Introduction
There is an ongoing trend in shooting JPEG only nowadays. As sensor resolutions are getting bigger and bigger, RAW files are getting larger, too. Even with compression enabled, a RAW file of a 24 megapixel sensor can easily use up to 25 MB of disk space. Sure, there is always the argument that disk space is cheap and still getting cheaper. However, the JPEG images coming out of the latest mirrorless cameras are very good in terms of quality. This mitigates the need for RAW files in most situations.
As I already mentioned in one of my previous posts, the film simulations that Fuji provides on their X cameras are pretty amazing. Fuji has integrated some special filters into the JPEG engines of their X series of cameras. These filters try to mimic the characteristics of some of the good old classic films, like the Kodachrome, for example. Sure, you can’t really mimic the optical characteristics of a roll of film with digital filters, but they do get close in my opinion.
The following simulations are available:
- Provia/Standard
- Velvia/Vivid
- Astia/Soft
- Classic Chrome
- Pro Neg. Hi
- Pro Neg. Std
- Monochrome (incl. yellow, red and grey filter)
- (new) ACROS (incl. yellow, red and grey filter)
They all have different characteristics, as shown on this Fujifilm blog post. Generally, these simulations are only available on the camera’s JPEG engine. If you shoot RAW or RAW+JPEG, you can even apply a specific simulation after you took a photo. However, fiddling around on the camera can be annoying so I always wanted to be able to apply them in post processing. Well, I’ve got good news for you: They are available in Lightroom!
How it works
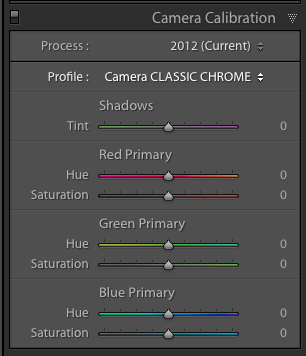
If you are in the develop module in LR enable the tab camera calibration:
If you click on the profile drop down menu, you will get the following list of available simulations:
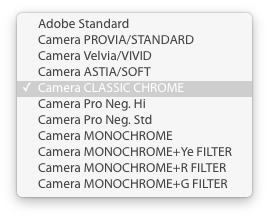
The simulation selected will be applied immediately. The only thing that is not available here, is the sepia simulation. But that is actually not that big of a deal, because Lightroom has several good presets for sepia, in my opinion.
Examples
[envira-gallery id="280"]
Conclusion
As you can see in the examples above, the differences are rather small. My favorite simulation for color is the classic chrome, because it reduces saturation and increases contrast. This can be helpful in street photography, because there are a lot of colors in the cities nowadays and your photos can become overloaded quite quickly. This can help you to focus on geometry, lines and other important things in your composition. My favorite black & white simulation is the monochrome in combination with the red filter. This will give you strong contrasts and very dramatic skies.